 | | | Pop-Up Drain Photo Jim Hurley | | | | | | How annoying is it when the sink stopper goes down and won't come back up? Is that worse than when it is just hanging loose, won't go up or down, in the drain of your bathroom sink? After previously advising you to call a specialist for your drainage problems, your bathroom sink stopper could be the exception.
 If your sink stopper is working, my best advice to you is this: Don't pull up on that bar at the back of the faucet to close the stopper! Use your thumb instead to push the stopper down. Then push down on the bar at the back of the faucet to open it. Pulling up too vigorously is probably the most common cause of the drain stopper getting disconnected from the lever. Pulling up gently on the rod can work, but one hearty yank is all it takes to pull the thing out of place. Pushing the stopper down with your thumb will work every time.
Now if the stopper is not working, there may be a quick fix to the problem. Most older sink stoppers work with a lever bar to lift and lower the drain stopper. The lever is under the sink. You will find the lever about two inches below the basin where it is attached to the back of the drainpipe. (That piece of pipe connecting the sink to the P-Trap is called the "tailpiece"; I don't know why.) The lever bar has a Teflon ball attached to it and the nut on the tailpiece makes it pivot, like a teeter-totter, so that the stopper will go up and down when it is properly attached and adjusted.
Start with a little diagnosis. Gently lift the drain stopper: if it comes out of the pipe, the lever is not attached. Examine the stopper; there should be a ring at the bottom to attach to the lever. If the ring is there, it is time to reattach the stopper. Unscrew the nut that holds the lever to the back of the tailpiece, gently pull the lever a little way out of the tailpiece, then slip the tip of the lever back into the ring on the base of the stopper. This might take a few tries to get everything lined up, but when it's done correctly, rocking the lever up and down will make the stopper go up and down. Tighten the nut back in place: Use your fingers to screw the nut back on and gently tighten with a wrench. Then test the drain for leaks. The back end of the lever is attached by a piece of metal and a screw to the little rod at the back of the sink faucet. Sometimes that screw becomes loose and slips on the rod, so make sure it is tight.
If the ring is missing from the stopper, you will need to buy a replacement stopper. They are available at the hardware store and come in various widths and lengths, so take the old one with you to look for a match. Depending on the age of the sink, the lever may also be corroded and need replacement. Finding an exact replacement lever might be tricky unless you know the make and model of your sink faucet.
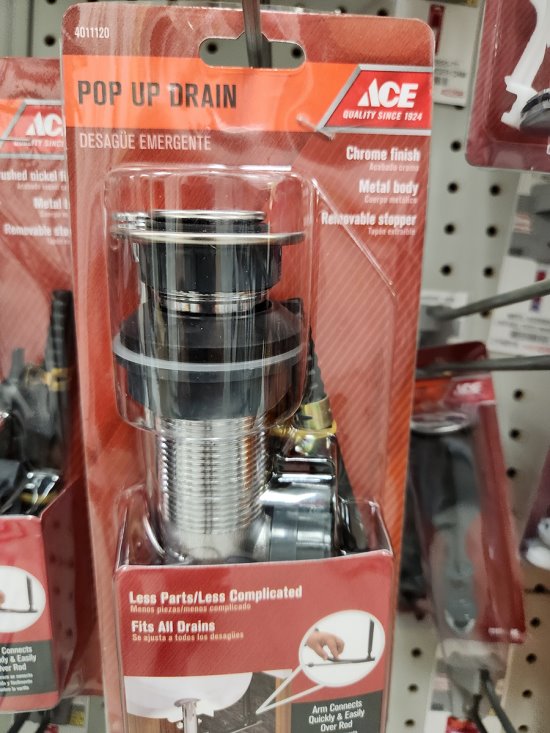
Before you go to look for replacement parts, you might consider replacing the whole drain with a "Pop-Up" drain stopper. It will replace the worn-out lever and stopper without having to find an exact match to the old pieces. I would especially recommend this if the stopper seat in the sink is worn or corroded. With a pop-up stopper you push down to close, and push again to open, kind of like clicking a ball point pen. While I have encountered some broken pop-up stoppers, (the works can wear out and need replacement), the good news is they are all one universal size (1-1/4 inch) - easy to find.
The best approach to installing a pop-up starts with emptying the cabinet under the sink. This gives you access to the plumbing and prevents any stray water from damaging what you store down there. If the cabinet doors are easy to remove, consider taking one or both off to give you more room to move around beneath the sink. Grab a small bucket or pot and some rags to catch drain water as you remove the P-Trap. It also helps to have adjustable, channel-lock pliers handy. Lastly, get yourself a work light or flashlight, no sense groping around in the dark.
If this sounds like more trouble than you were looking for, it's time to call your handyman. Be sure to push that working drain stopper down with your thumb and enjoy many years of maintenance-free drainage. |