Give your Valentine the gift of crispy, buttery cookie goodness
Valentine’s Day is a free pass to go all out on sweets, especially cookies covered in icing and sprinkles! These brown sugar Valentine’s cookies fully embrace the moment. Crispy and buttery, with a hint of caramel flavor, they’re the kind of cookies that disappear quickly from the counter (usually “just one more” at a time).
There’s something extra special about baking for Valentine’s Day — maybe it’s the heart-shaped cutters, or the simple joy of making something sweet for the people you love. I love baking with light brown sugar and these brown sugar Valentine’s Day sugar cookies are delicious with just the right texture. Once you try them, I’m pretty sure you’ll fall in love with them.
Brown sugar gives them a richness while keeping them tender enough to melt in your mouth. The dough rolls out beautifully, bakes evenly, and holds its shape, making it ideal for cutting into hearts, scallops, or any festive Valentine shape you can dream up.
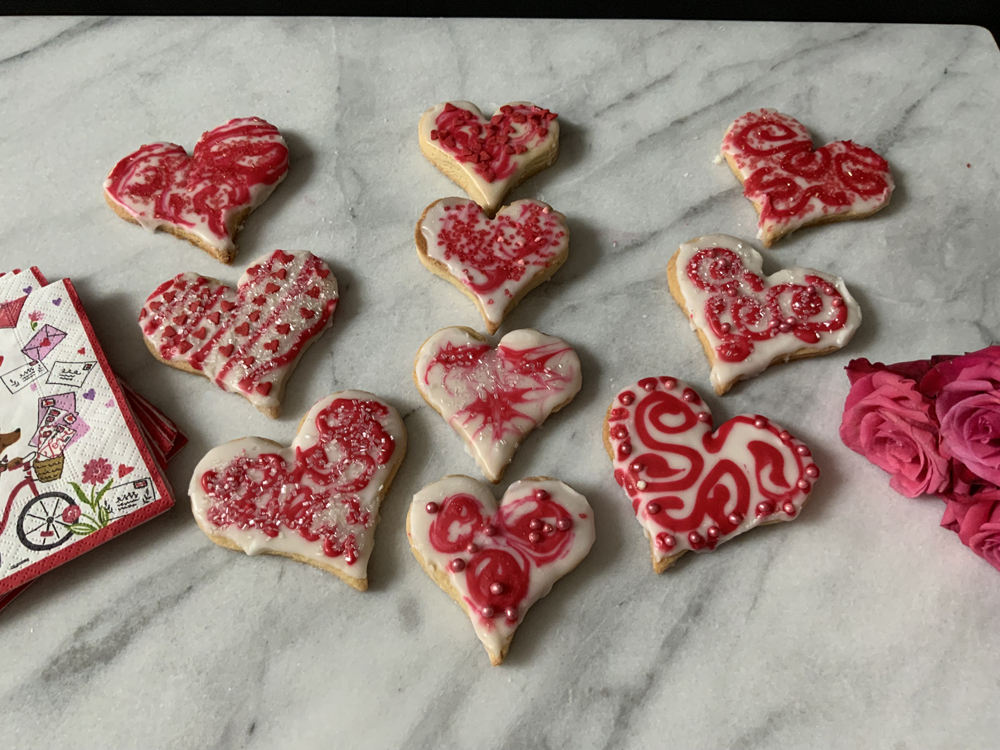
Once the cookies are cool, the real fun begins. A smooth layer of white icing turns each cookie into a tiny canvas, and pink icing adds flair while the sprinkles add sparkle. Mini hearts, colorful sugars, and cheerful pops of color make every cookie feel like a mini celebration. There’s no wrong way to decorate them — messy, playful designs are half the fun.
I used an offset spatula to spread the white icing on the cookies first. Then, I made the pink designs from pink icing I had put into a pastry bag fitted with a small-ish plain tip. The pink icing was fun for creating designs over the white. A toothpick helped to create swirls and patterns from the pink icing. Then, I topped everything off with my favorite Valentine’s sprinkles and sugars.
These cookies are perfect for baking with kids, sharing with friends and neighbors, or tucking into little bags for teachers and classmates. They’re sweet and festive without trying too hard and guaranteed to bring smiles wherever they go.
Grab your rolling pin and clear some counter space … the loves of your life will be glad you did!
Valentine Cookies
INGREDIENTS
3/4 cup unsalted butter (at room temperature)
1/4 cup granulated sugar
1/2 cup light brown sugar
1 large egg
2 tsp. pure vanilla extract
2 1/2 cups all-purpose flour
1/2 tsp. baking powder
1/2 tsp. salt
Icing and Decorating Ingredients
4 cups powdered sugar (sifted)
2 +/- tbsp. milk
1 tsp. vanilla powder (can use vanilla extract, but it will change the color of the icing.)
food coloring gels for decorating (Red and Pink)
sprinkles (to match the occasion)
DIRECTIONS
Sift flour, baking powder, and salt into a medium sized bowl.
Cream together butter and both sugars until light and fluffy, scraping down the bowl with a rubber spatula as needed. Add egg and beat well. Stir in vanilla.
Add flour mixture and beat into butter mixture on low speed. Gather the dough into two balls.
Prepare two pieces of parchment paper with a dusting of flour and roll out half of the dough onto each parchment. Place the parchment paper with the dough on a baking sheet and completely cover with plastic wrap. Refrigerate for at least 2 hours, or overnight.
When ready to cut the cookie shapes and bake them, preheat the oven to 350 F. Remove one sheet of the rolled-out dough on the parchment paper from the baking sheet and place it on the counter or a cutting board. Place a new piece of parchment paper on the baking sheet.
Cut out the cookie shapes and place them onto the prepared pan. Gather up any extra dough and re-roll to continue to cut as many cookies as possible. With the last bit of dough, I usually just make a flat round cookie.
Bake the for about 10-12 minutes, or until golden brown and dough is set. (While the first batch is baking, you can start to cut out the second batch of dough.) Remove the cookies from the oven and cool for about 10 minutes before placing them on a rack for decorating. Repeat the process with the second batch of dough. Be sure cookies are completely cool before decorating.
Whisk together powdered sugar and vanilla powder. Slowly add milk until you get to a good icing consistency. You can always add more powdered sugar or more milk to get to a good consistency – not too runny, but not too thick. Add whatever food coloring you have selected. I used plain white and pink. I put the pink icing in a pastry bag fitted with small a plain round pastry tip.
Frost the cookies with your base color, (in my case the white) and allow to sit for few minutes. Then, using the second color in the pastry bag, pipe designs onto the frosted cookie. Using a toothpick, swirl the pink icing to make fun designs. Decorate with the sprinkles at once, before the icing gets hard. Allow decorated cookies to sit for about an hour before packing them into storage containers or bags.
These cookies store well in an airtight container in the refrigerator for about a week, and in the freezer for up to a month.
Copyright 2026, Lamorinda Weekly