| | Published March 22nd, 2017
| Brioche
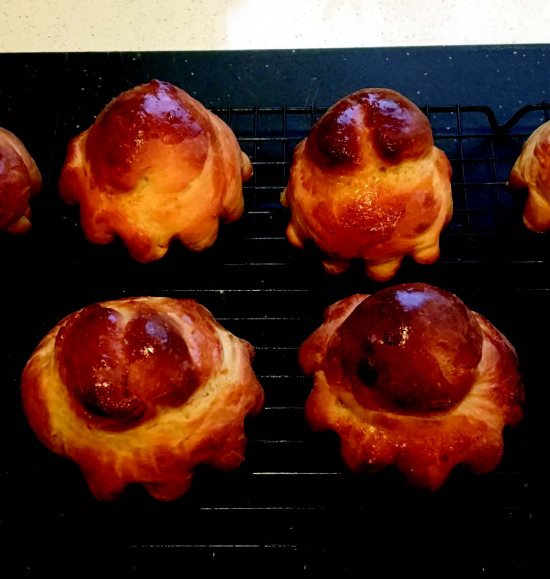
| | | By Susie Iventosch |  | | This brioche beckons cooks. Photo Susie Iventosch |
(based on a recipe found at finecooking.com)
 (Makes 16 three-inch brioches)
 You will need 3-inch diameter brioche tins/molds for this recipe. If you don't have them, try using a large muffin tin.
 INGREDIENTS
 18 ounces unbleached all-purpose flour (approximately 3 1/4 cups, but better to weigh it.)
 2.5 oz. granulated or light brown sugar (approximately 1/3 cup)
 1/2 oz. active dry yeast (also equals 2 packets, or 4 1/2 teaspoons)
 1 tsp. salt (.2 ounces)
 4 large eggs for dough
 1 egg for egg wash plus pinch of salt
 4 oz. (1/2 cup) milk
 8 oz. (1 cup or 2 sticks) unsalted butter, cut into small, 1/2-inch cubes

 DIRECTIONS
 Make the dough
 Place flour, sugar, yeast and salt in the bowl of your KitchenAid or mixer. Stir with a spoon, or on slow with the paddle attachment.
 Switch to the dough hook and add 4 eggs and milk and start mixing on low speed. Stop occasionally to scrape down sides of the bowl. Continue to mix on medium speed for about 2 to 4 more minutes, or until the dough is firm.
 Next, add half of the cubed butter to the mixer. Continue to mix the dough on medium speed until butter begins to incorporate. Stop machine and scrape down sides with a spatula and stir any butter into the dough that is left on the edges. Continue to mix until first half of butter is incorporated. Add remaining butter and continue the process for about 4-8 more minutes or until butter is fully incorporated, scraping sides of bowl as necessary. When the dough is ready, you will hear it slap against the sides of the bowl. Dough may be very soft, but that's okay. Don't add extra flour!
 Letting the dough rise
 Turn dough out onto a very lightly floured surface. Knead it just a few times and form into a ball. (You can do this by bringing all four sides into the center and then flip the dough over so the smooth side is up.) Transfer dough to a greased or sprayed bowl, with the smooth side up. Cover loosely with a damp cloth or plastic wrap and allow to rise in a warm spot in your kitchen, but not in the oven! This should take about 1 hour.
 When dough is risen to about double in volume, turn out again onto a lightly floured surface and form it into a large ball, again folding all four sides to the center and then flipping over to keep smooth side of ball on top.
 Bench-proofing the dough
 At this point, you can decide whether to allow the dough to rise again immediately, or refrigerate overnight, which is said to make even better brioche. If you decide to make them right away, then place dough back in bowl, cover with plastic wrap or a damp towel, and allow to rise to double again. This is the bench-proofing stage, and will take about one hour. If you plan to refrigerate the dough, cover the bowl tightly with plastic wrap and refrigerate overnight. Just remember to take the dough out of the refrigerator and allow to warm and rise for a couple of hours before shaping. This will allow the dough to warm up and to bench proof (second rising),
 Shaping the brioche and making the "tąte" (French for "head")
 Spray the brioche tins with Pam of other cooking spray. I have 8 brioche tins, so I make this recipe in two batches.
 Turn the dough out onto a lightly floured work surface and shape into a nice, smooth ball again. Divide dough into 2 equal parts. Divide each half into 8 equal smaller smooth round balls, for a total of 16 balls.
 To shape brioche and make the "tąte", use the side of your hand, leading with the long part of the pinky finger cut 1/3 of the way into the ball, but not all the way through. You will have a larger body, with a dangling smaller ball attached by a narrow piece of dough.
 Now you can choose either method A or B below: (see video link in article above)
 A. Form a hole in the bigger part of the brioche and slip the smaller head up and through the whole. This allows the "tete" to be formed and to remain intact during baking.
 B. Or, twist the little neck between the big and small part of the ball and rest the smaller ball in the on top of the center of the bigger part of the ball. Tuck the head down into the body just a little bit.
 Carefully, place the brioche, tąte squarely on top, into the prepared brioche tins. Cover loosely plastic wrap. Allow to rise (proof) one final time to almost double in size, approximately 1 hour.
 Meanwhile, preheat oven to 375 degrees and make egg wash. Brush the tops of the brioches with the egg wash, being careful not to let the egg drip over the sides and into the brioche pans.
 Bake at 375 degrees for about 15-18 minutes, or until brioches are dark golden-brown on tops and sides. Let brioches cool for about 10 minutes on a wire rack before unmolding.
 Repeat the shaping, rising and baking process with the second half of the dough, if you have only 8 brioche pans.
 I have found that these brioches store very well in an airtight container in the refrigerator for at least a week, and they can be frozen, too. Thaw and warm before serving, if frozen.

|
| | | | | | | | | | | | |


