The no tears way to tackle the tiers of a wedding cake
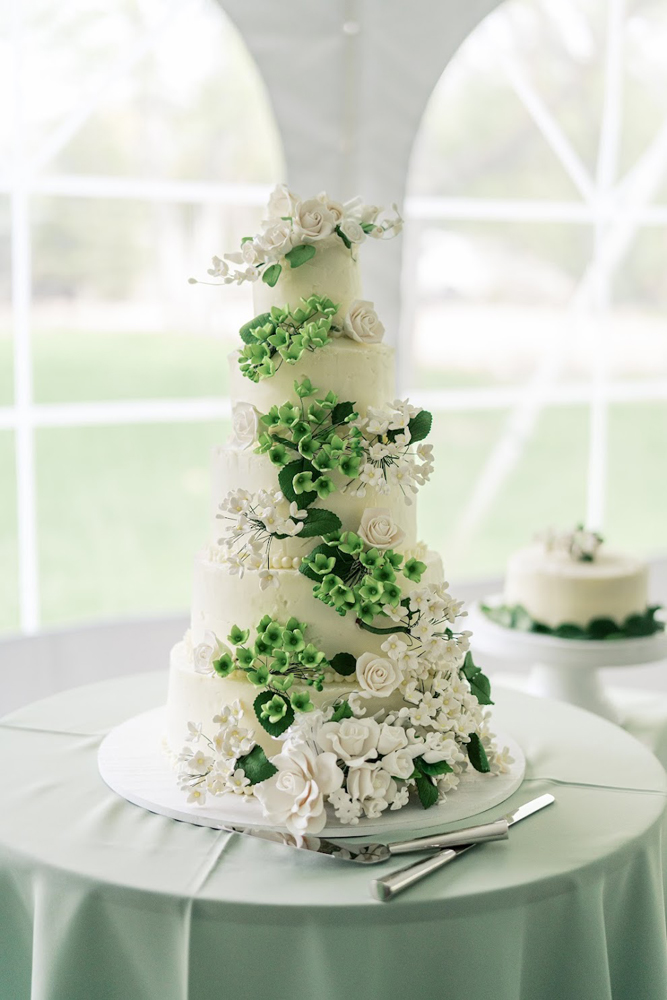
There are many things I am not an expert at: making wedding cakes, frosting wedding cakes, and decorating wedding cakes among them. But despite my lack of formal expertise, I have made a handful of wedding cakes over the years for friends and family. This most recent one — my fifth — was especially meaningful because it was for my daughter, Courtney, who was married on May 2.
To build my confidence before creating my own daughter’s wedding cake, I watched many YouTube tutorials and one of my favorites was by Anthony Gregorio of Global Sugar Art (https://globalsugarart.com/). I was so inspired by his work that I ordered all the decorative flowers for the cake from Global Sugar Art – rose buds, rose sprays, and both green and white hydrangeas. They arrived carefully wrapped in protective foam and were almost too beautiful to touch.
In the end, the cake turned out even better than I had hoped, thanks to Courtney’s dear friend Mark Miller who stepped in with his wonderful eye for design. I had never made a cake for 180 people, but now that I have survived the experience, I honestly think I would do it again — especially with the help of those beautiful Global Sugar Art flowers — and Mark!
One of the trickiest parts of building a wedding cake is figuring out how to scale recipes for multiple tiers. I concluded that the simplest approach was to use my standard 8-inch cake recipe as the baseline. For each additional two inches in diameter, I doubled the recipe. So, for this cake’s 10-inch tier, I doubled the recipe, and for the 12-inch tier, I quadrupled it.
The smaller tiers required working backwards. Instead of halving the recipe for the 6-inch tier and quartering it for the 4-inch tier, I simply used one recipe to make both the 4-inch and 6-inch layers together.
One helpful tip when working with different-sized pans is to keep the batter depth consistent across all tiers. In other words, if your 8-inch pans are filled about two-thirds full, aim for that same batter height in every pan regardless of size. This helps ensure the cake layers bake evenly and maintain similar proportions throughout the finished cake. In addition, you want to use a bread knife to cut the domed top part of your layers, so that the top of each layer is flat. Those scraps make for delicious snitching!
And while I may never call myself an expert wedding cake baker, I will say this: there is something deeply special about creating a cake for someone you love. Especially when that someone is your daughter.
Wedding Cake
INGREDIENTS
Dark Chocolate Wedding Cake
(Recipe for a 2-layer/8-inch Tier)
11 oz. unsalted butter (softened to room temp)
1 3/4 cups granulated sugar
1 cup light brown sugar
2 tsp. vanilla extract
4 oz. bittersweet chocolate, (60% cacao) melted and cooled to room temp
5 large eggs (at room temp)
2 1/2 cups all-purpose flour
1/2 cup unsweetened cocoa powder
4 tsp. baking powder
3/4 tsp. salt
1 cup milk
1/2 cup nonfat plain Greek yogurt
1/2 cup dark chocolate chips
Buttercream Frosting and Pistachio Filling
2 cups unsalted butter at room temperature (4 sticks or 16 oz.)
1 3/4 lbs. powdered sugar, sifted
1/2 teaspoon salt
1 tablespoon vanilla powder (this helps keep the frosting whiter than using vanilla extract)
1/4 cup tablespoons cream or milk +/-
1/2 cup pistachio butter for the filling
DIRECTIONS
Cake Directions
Line two cake pans (8-inch for this recipe) with parchment paper rounds. Spray the tops of the paper and the sides of the cake with cooking spray. Preheat oven to 350 F. Sift together flour, cocoa powder, baking powder, and salt. Set aside. Melt bittersweet chocolate and cool to room temperature. Set aside.
In a large bowl or in the bowl of your standing mixer, beat butter until fluffy and light yellow in color. Slowly add both sugars and continue to beat until creamy and well-integrated. Beat in vanilla extract. Beat in cooled, melted chocolate. Add eggs, one at a time, beating well after each and scraping down the sides of the bowl as needed. Add flour mixture and milk, alternately, beginning and ending with flour. Fold chocolate chips into the batter.
Evenly distribute the batter into the two prepared pans. Fill each pan to about 2/3 full. I use a kitchen scale to make sure I have the same amount of batter in each layer. Adjust each layer as needed by spooning a little bit in or out of the pan.
Bake for 35-40 minutes, rotating cake layers front to back about halfway through the baking. Test cakes with a toothpick inserted into the center of each layer to make sure the cake is done and you get a few crumbs and not a bunch of sticky batter.
Remove cakes from oven and cool on a rack for about 20 minutes. When cool enough to handle, invert cakes to remove from the cake pans and continue to cool on the rack. When completely cool, you can begin to assemble the cake or you can wrap each layer carefully in plastic wrap and then inside a baggie and freeze for up to a couple of months before frosting, decorating, and serving.
Frosting/Filling Directions
In a large bowl or the bowl of your standing mixer, beat the room temperature butter until light and fluffy. Add vanilla powder and mix well. Slowly beat in powdered sugar, alternately with milk until all the sugar has been incorporated. Scrape down the bowl as you go and be sure to gather up any powdered sugar at the bottom of the bowl that has not been incorporated into the frosting. You may need slightly less or slightly more milk, just keep an eye on the consistency so that it isn’t too soft, but will spread easily. When you pull your spatula out of the bowl, it should leave soft peaks of frosting. Also, by beating the sugar into the butter at a slower speed, you can more easily avoid creating air bubbles in the frosting.
Make the filling by blending ½ cup pistachio butter or cream into 1/3 of the buttercream frosting until well blended.
Assembling the Cake
For each tier of your wedding cake, place one layer on a cardboard cake round sized to fit the diameter of the cake. Spread the filling over the bottom layer. Invert the second layer and place it bottom side up on top of the filling and press down to make sure the cake is even. At this point, you can chill the cake by putting it in the freezer for about 20 minutes before frosting the crumb layer all over the cake. Freezing or chilling the cake makes this next step much easier.
Place your cake tier on a cake turntable, and, using an offset spatula, spread half of the frosting completely over the top and sides of the cake, being careful to make it as smooth as possible. Use a bench scraper to help even out the frosting. This coat of frosting is just the base, so it doesn’t have to be perfect. Once you are satisfied with this step, chill the cake again before applying the final coating of frosting.
Using the same offset spatula and bench scraper, apply the final coat of buttercream frosting all over the top and sides of the cake. Having your cake on a cake turntable will help you to make the frosting smooth and even.
Chill the frosted cake again until you are ready to assemble and decorate the cake and repeat this process with each tier that you plan to make.
For the final cake assembly, place your largest tier on the cake plate or platter that you plan to display the cake on for your event. Insert about 6-8 cake dowel rods into the area of the bottom tier that the next tier will set upon. So for example, if you have a 12-inch bottom tier, the cake dowels will be placed into the circular area the size of the 10-inch layer, which will sit directly on top of these dowels. This helps to hold the layers firmly in place without sinking into each other. Repeat this process with each tier.
Finish the seams between tiers by piping frosting to cover the gaps using whatever decorative tip you like. I used a plain round one to make dots, but you can use open star tips or whatever decorating tip that is aesthetically pleasing to you.
Once the wedding cake is assembled, it’s time to position the flowers. We used plastic cake picks to cover the wires from the flowers and inserted them directly into the cake wherever we wanted to place the flowers. This keeps the wire from going directly into the cake. Don’t worry … a professional cake server will know about these and remove them when cutting and serving the cake.
Copyright 2026, Lamorinda Weekly